

Shoot 4K at 60 frames per second, Protune on, Color set to Flat, ISO locked between 100 and 400, and shutter at 1/120. Turn HyperSmooth on if you want a quick edit straight off the card, or turn it off and stabilize later in ReelSteady or Gyroflow if you want the cleanest possible result. That single combination works on the HERO10, HERO11, and HERO12, and it fixes the two problems that ruin most helicopter footage: rolling shutter jello and blown-out highlights.
TL;DR:
- Proper mounting and vibration damping are critical, as a shaky mount cannot be fully corrected through camera settings or stabilization software.
- Using a rigid, damped mount, setting the camera at 20 to 30 degrees upward tilt, and confirming operator approval ensures stable footage during helicopter flights.
- The recommended camera setup involves locking shutter at double the frame rate, ISO ceiling at 400, and shooting in flat color profiles with high bitrate for complex aerial scenes.
- For best stabilization, record with HyperSmooth off and stabilize in post using Gyroflow or ReelSteady, rather than relying solely on in-camera correction.
- Carry enough charged batteries and proper ND filters, and plan shutter speeds according to lighting conditions for optimal exposure without introducing motion artifacts.
Table of Contents
- Gopro Helicopter Settings by Shooting Goal and Camera Model
- What Do Protune’s Shutter, Iso, and Color Settings Actually Do?
- HyperSmooth vs ReelSteady: Which Stabilization Actually Wins?
- How Should You Mount a GoPro Inside a Helicopter?
- What Shutter Speed and ND Filter Should You Use for Helicopter Footage?
- Preflight Checklist Before You Board
- How Helicopterstour Verifies Operator Camera Policies
- Battery Management and Realistic Recording Times
- Why Does Helicopter Audio Sound So Bad, and Can You Fix It?
- Getting the Camera Angle Right on a Helicopter Mount
- Managing Wi-Fi and Remote Control in Flight
- The Setting Most People Get Wrong on Their First Flight
- Flying With a Camera? Let Helicopterstour Find the Right Tour
- Sources
- FAQ
Gopro Helicopter Settings by Shooting Goal and Camera Model
There’s no single “correct” setting for every helicopter flight, because a doors-off sunset shoot over a coastline calls for different math than a midday tour over a city grid. What stays constant across the HERO10, HERO11, and HERO12 is the underlying logic: protect the shutter speed, protect the highlights, and shoot wide enough that you can crop later without regret.
Cinematic aerial preset (best for tour operators, marketing footage, or anything headed for a real edit):
- Resolution and frame rate: 4K at 24 or 30fps for a film-like cadence, or 4K/60 if you want the option to slow it down later.
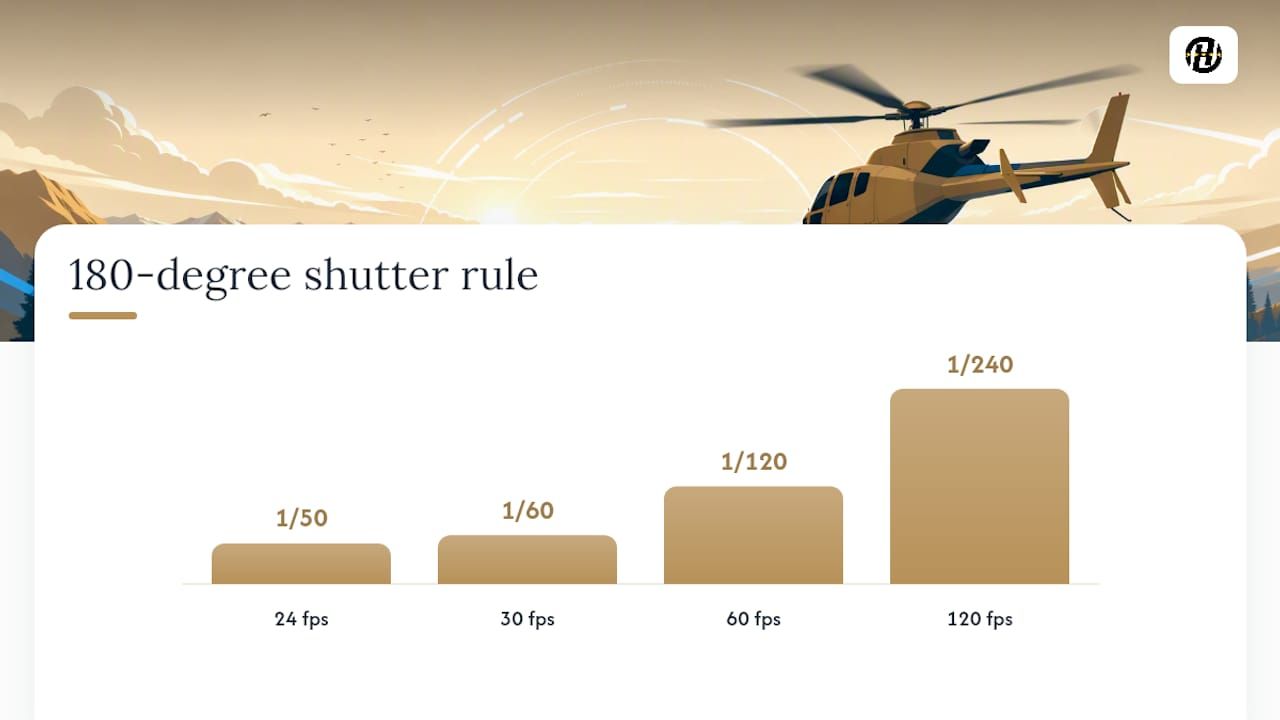
- Shutter: locked at 1/120 for 60fps capture, following the standard 180-degree shutter rule that keeps motion blur natural instead of stuttery.
- FOV: SuperView or Wide, which GoPro itself recommends for aerial and FPV-style capture.
- HyperSmooth: On for convenience, Off if you plan to stabilize in post.
- Color: Flat, ISO Min 100, ISO Max 400.
Smooth standard preset for footage you want to post the same day: drop to 1080p or 2.7K, leave HyperSmooth on Boost, and skip Flat color if you don’t plan to grade. It’s a faster round trip from card to Instagram, with a real quality trade-off in exchange for speed.
Slow-motion preset for dramatic rotor-blade or landing shots: 2.7K or 1080p at 120fps or higher, shutter locked to roughly double your playback frame rate. Higher frame rates chew through storage fast, so budget extra SD card space and expect shorter total recording windows per battery.
Photo-grab preset: if you’d rather pull stills than shoot dedicated photos, record in the highest resolution your model supports and extract frames in post. It’s slower than shooting stills directly but gives you far more flexibility to pick the exact moment.
What Do Protune’s Shutter, Iso, and Color Settings Actually Do?
Protune exists because Auto mode makes decisions that work fine on a bike helmet and fail badly at 1,000 feet. Turning it on hands you the controls that matter most for helicopter work: shutter speed, ISO ceiling, color profile, bitrate, and aspect ratio.
Shutter speed should follow the 180-degree rule, which sets your shutter to roughly double your frame rate. At 24fps that’s 1/48 (round to 1/50), at 30fps it’s 1/60, at 60fps it’s 1/120, and at 120fps it’s 1/240. Go faster than that and footage looks choppy and strobe-like; go slower and it smears.
ISO should stay tight. Set ISO Min to 100 and ISO Max to 400, only raising the ceiling for genuinely dark conditions like a dusk approach. A wide-open ISO ceiling is how helicopter footage ends up grainy even in decent light, because the camera defaults toward higher ISO rather than a slower shutter it’s not allowed to use.
Color profile should be Flat or Log if your model supports it. Flat captures a wider dynamic range and preserves highlight and shadow detail that Vivid or Natural crush in-camera. Shoot in 10-bit where the HERO12 and newer models support it, since 10-bit capture gives you meaningfully more room to grade skies and water without banding.
Bitrate should be set to High. Helicopter footage tends to be visually complex, full of moving foliage, water texture, and fast pans, and a low bitrate turns all of that into compression blocks the moment you push in during editing.
Aspect ratio matters more here than in almost any other GoPro use case. Shooting in native aspect ratios like 8:7 or 4:3 captures more vertical data helpful for post stabilization to correct for pitch and roll without cropping your final frame down to a sliver.
Community reports of the classic “jello” wobble on older Hero models trace back almost entirely to low frame rates paired with slow shutter speeds on a vibrating mount. Higher fps, a properly locked shutter, and a better mount solve most of it without touching a single stabilization setting.
Pro Tip: Lock your white balance to daylight, around 5500K, instead of leaving it on Auto. Auto white balance drifts as you bank between shaded and sunlit terrain, and that color shift is far harder to fix in post than a slightly warm or cool starting point.
Set Sharpness low to avoid adding digital noise and artifacts. Helicopter footage already has enough fine detail from rotor blur and terrain texture that high in-camera sharpening just adds digital noise and edge artifacts you’ll fight later.
HyperSmooth vs ReelSteady: Which Stabilization Actually Wins?
Leave HyperSmooth on when you need footage ready to post within the hour and can accept a modest crop. Turn it off when the shot matters enough to justify a post-processing pass, because in-camera stabilization simply can’t match what a dedicated tool does with the raw gyro data.
The workflow for the best possible result looks like this:
- Set HyperSmooth to Off before you take off.
- Confirm Protune is on and gyro data logging is active (this happens automatically when HyperSmooth is off on compatible models).
- Record in your widest usable aspect ratio, ideally 8:7 or 4:3, to leave the stabilizer room to work.
- Keep bitrate on High and color on Flat straight through to the edit.
AutoBoost sits in between the two extremes: it applies more aggressive in-camera correction than standard HyperSmooth but crops the frame further to do it. Use it only when you’ve already accepted a tighter, more zoomed-in composition.
Pro Tip: For the cleanest final product, shoot flat with HyperSmooth off and stabilize in Gyroflow, which is free and reads GoPro’s native gyro telemetry, or ReelSteady, a paid tool built specifically for this kind of high-vibration aerial footage.
How Should You Mount a GoPro Inside a Helicopter?
The mount matters more than the camera body. A rigid mount with genuine vibration damping will do more for image quality than jumping from a HERO10 to a HERO12, because no sensor upgrade fixes footage that’s physically shaking 40 times a second.
Rail mounts and properly rated window or skid mounts hold up far better than suction mounts, which flex under airflow and rotor vibration and are a poor choice for anything mounted outside the cabin. Look for hardware built with stainless steel fasteners, cotter pins for secondary security, and a swivel joint, features found on dedicated products like the MyPilotPro helicopter GoPro mount, which uses neoprene spacers and a glass-filled nylon body specifically to absorb high-frequency vibration before it reaches the sensor.
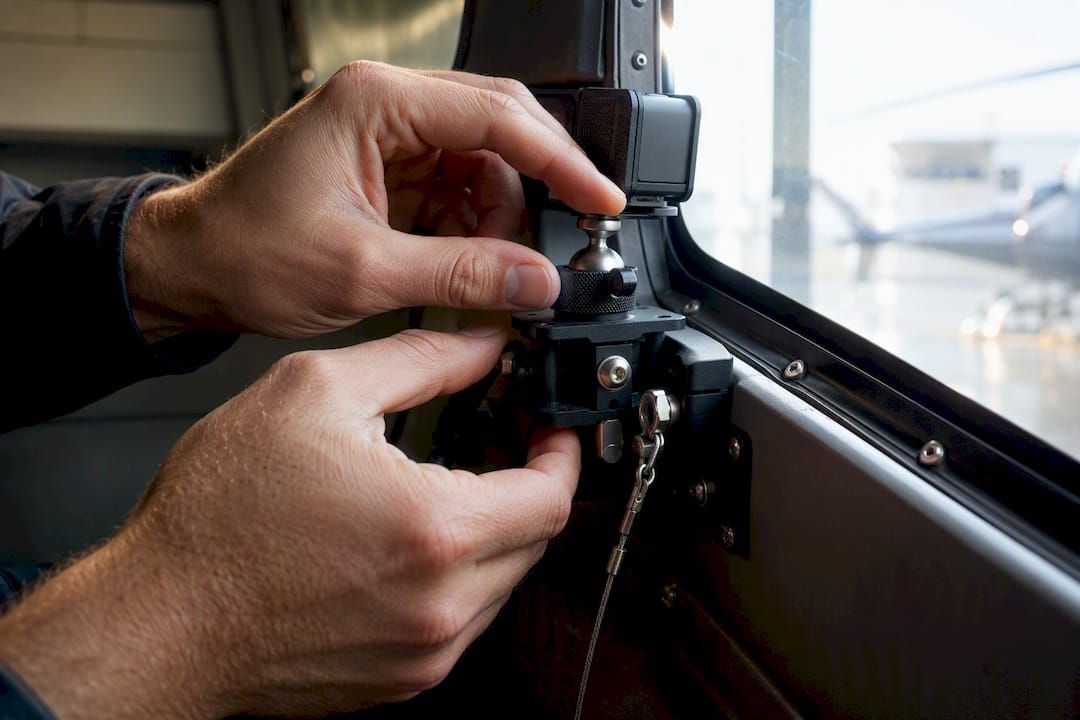
Angle the camera with a 20 to 30 degree uptilt on most external mounts to compensate for forward airspeed and avoid capturing too much skid or door frame in the shot.
Pro Tip: Never attach an external mount without the operator’s explicit sign-off. Every reputable tour operator has rules about what can and can’t be secured to the airframe, and skipping that conversation is both a safety risk and, on most tours, a fast way to get your gear confiscated before takeoff.
What Shutter Speed and ND Filter Should You Use for Helicopter Footage?
The 180-degree rule sets your baseline: shutter speed should be roughly double your frame rate, and an ND filter is what lets you hit that shutter without overexposing on a bright day. At 24fps, target 1/50 with an ND8 in overcast light or an ND16 in full sun. At 30fps, target 1/60 with similar ND strength. At 60fps, target 1/120, often needing an ND16 or ND32 at midday. At 120fps for slow motion, target 1/240, which usually needs less ND unless the light is extreme.
The most common mistake is leaving shutter on Auto with an ND filter attached, which defeats the entire purpose since the camera just compensates by lowering ISO instead of respecting your target shutter. Carry an ND8, ND16, and ND32 in your kit, plus an ND4 for golden-hour flights when the light is softer.
Preflight Checklist Before You Board
- Confirm the mount is torqued down, cotter pins are seated, and the operator has signed off on placement.
- Charge two to three batteries and confirm you have at least one spare high-speed SD card (V30 or better) per battery swap.
- Load your chosen preset, confirm Protune is on, and set HyperSmooth or gyro logging based on your stabilization plan.
- Lock white balance to daylight unless conditions call for a manual adjustment mid-flight.
- Decide your seat and window side in advance based on sun position and the shot list you actually want.
How Helicopterstour Verifies Operator Camera Policies
Every operator has different rules about external mounts, window removal, and doors-off flights, and those rules exist for real safety reasons. Some helicopter tour review platforms independently verify FAA-certified operators and review their safety standards before listing tours, providing photographers a starting point for knowing which operators are realistic about camera setups before they arrive at the hangar.
The coordination process is simple: ask about mount policy when booking, get written or verbal approval before the flight, and follow the crew’s instructions exactly once you’re on board, including any last-minute changes to where or how a camera can be secured. If a mount plan isn’t approved, don’t attach it. Reading through what to expect before, during, and after a tour helps set realistic expectations before you arrive.
Battery Management and Realistic Recording Times
Helicopter flights are short, usually 15 to 45 minutes, but continuous 4K/60 recording at High bitrate drains a GoPro battery faster than casual use suggests. Cold cabin air at altitude also reduces battery efficiency, so a battery rated for an hour on the ground may deliver noticeably less once you’re airborne in cooler conditions.
Plan around your actual flight length rather than the battery’s rated capacity. For a 30-minute tour, one fully charged battery is usually enough with margin, but for back-to-back flights or a full day of aerial work, carry at least two to three spares and swap between segments rather than mid-flight, since changing batteries in a moving aircraft isn’t practical or safe.
External battery packs exist for some GoPro models, but check with your operator before wiring anything to a mount. Loose cables near rotor controls or door frames are a legitimate safety concern, and most operators will simply say no. The simplest, safest approach is still the most effective one: bring enough charged batteries to cover your flight time with a buffer, and treat card changes and battery swaps as ground-only tasks.
Why Does Helicopter Audio Sound So Bad, and Can You Fix It?
Rotor noise and engine vibration overwhelm a GoPro’s onboard microphone almost immediately, which is why nearly all helicopter footage either sounds like a wall of white noise or gets its audio replaced entirely in post. The vibration itself also transmits through a rigid mount into the camera body, creating a low-frequency rumble on top of the rotor noise that’s distinct from the sound in the actual cabin.
There’s no in-camera setting that fully solves this. The most reliable fix is accepting that helicopter audio is a post-production problem: mute or heavily reduce the onboard track, then license or record separate ambient sound, add music, or use a voiceover if the footage needs narration. Some pilots and photographers use a small external windscreen over the mic port, which helps marginally with wind noise but does little against structural vibration or rotor frequency.
If capturing usable in-flight dialogue matters, such as a pilot narrating a scenic route, a separate wired or wireless lavalier microphone routed away from the airframe will always outperform anything built into an action camera. For a straightforward passenger flight where the footage is about the view, plan from the start to replace the audio track entirely rather than trying to rescue it.
Getting the Camera Angle Right on a Helicopter Mount
Camera orientation on a helicopter is different from a car, drone, or bike mount because the aircraft’s own attitude changes constantly with airspeed and maneuvering. A camera leveled perfectly on the ground will point noticeably downward once the helicopter picks up forward speed and pitches nose down.
That’s why a 20 to 30 degree uptilt, mentioned earlier for external mounts, isn’t arbitrary. It compensates for the aircraft’s natural forward pitch during cruise so the horizon lands where you actually want it in frame, rather than near the top with too much cabin or skid visible at the bottom.
For window or door-frame mounts, angle the camera slightly away from the fuselage to avoid capturing rotor blur or reflections off the airframe itself, and check the horizon through the GoPro app before takeoff rather than eyeballing it. Small angle errors that look fine on a 2 inch screen become obvious once footage is reviewed on a full-size display, and re-shooting isn’t an option mid-flight.
Managing Wi-Fi and Remote Control in Flight
GoPro’s Wi-Fi connection to the companion app works fine for confirming settings before takeoff, but treat it as a ground tool, not an in-flight one. Cabin electronics interference, distance from the mount to your phone, and the simple fact that your hands should be occupied with the aircraft experience all make live remote monitoring impractical once you’re airborne.
The better approach is to lock every setting you need, resolution, frame rate, Protune values, and HyperSmooth choice, before boarding, then start recording with a single button press and leave the camera alone for the duration of the flight. If your GoPro model supports voice control, a simple “GoPro, start recording” command is more reliable in a noisy cabin than trying to tap a touchscreen through gloves or turbulence.
Disable Wi-Fi entirely once recording starts if your model allows it. Keeping the radio active drains battery for a connection you won’t use mid-flight, and it’s one more variable an operator may ask about during a safety briefing.
The Setting Most People Get Wrong on Their First Flight
The mistake I see repeated most often isn’t a wrong resolution or a bad frame rate choice. It’s treating the mount as an afterthought while obsessing over Protune menus. A perfectly dialed-in Flat color profile and a locked shutter mean nothing if the camera is vibrating against a flimsy suction cup, because no amount of in-camera or post stabilization fully rescues footage shot from a mount that’s physically resonating with the airframe.
The conventional advice online leans hard into settings tutorials and barely mentions hardware, which is backwards. Get the mount right first: rigid, properly damped, and cleared by the operator. Then worry about whether you’re shooting Flat or Natural color. A stable, slightly imperfect exposure will always edit better than a technically perfect frame that’s shaking.
The second thing people underestimate is how much operator coordination shapes the final result. Show up with a plan already discussed with the crew, and you’ll get better camera placement, better lighting information about the route, and footage that actually reflects the flight you paid for.
— Justin
Flying With a Camera? Let Helicopterstour Find the Right Tour
If external mounting, ND filters, and Protune menus sound like more setup than you want to manage before a flight, there’s a simpler route: book a tour with an operator that already welcomes cameras and knows how to work around them.

Certain travel resources review operators for safety standards and indicate which tours are photography-friendly, helping users avoid the guesswork of contacting each operator to inquire about mount policies. Instead of researching hardware compatibility and chasing down operator policies on your own, you can browse reviewed helicopter tours and see which ones already accommodate photographers before you book. If you’re deciding between a private charter and a shared seat, the private versus shared tour comparison breaks down which option gives you more control over camera placement and timing. Check availability for a tour near your next trip and confirm the camera policy directly with the operator before takeoff.
Sources
For deeper technical detail beyond this guide, GoPro’s own ISO and Protune articles and HERO12 video settings page cover model-specific menus in full, while Oscar Liang’s FPV settings guide documents shutter and gyro workflows in more technical depth.
- HERO9-10-11 Black ISO Settings And Tips — GoPro Community
- Best FPV drone camera settings — GoPro
- GoPro drone filming tips and techniques: Cinematic Guide 2026 — DroneNestle
- Best GoPro settings for FPV and aerial — Oscar Liang
FAQ
Should HyperSmooth Be On or Set to AutoBoost?
Use standard HyperSmooth On for footage you’ll post quickly with minimal editing, since it balances stabilization and crop reasonably well. Use AutoBoost only if you’re comfortable with a tighter, more zoomed-in frame in exchange for stronger in-camera correction, and turn HyperSmooth off entirely if you plan to stabilize with ReelSteady or Gyroflow.
What Are the Best Camera Settings for Helicopter Aerial Photos?
For stills, shoot in the highest resolution your GoPro model supports with HDR off, since HDR processing can introduce ghosting on fast-moving aerial subjects. Many photographers also extract stills from 4K or 5.3K video footage after the flight, which gives more flexibility to pick the exact frame.
What Are the Recommended Protune Settings for a GoPro on a Helicopter?
ISO Min 100, ISO Max 400, Flat or Log color profile, shutter locked to the 180-degree rule for your frame rate, High bitrate, and Sharpness set to Low.
Do the Same GoPro Settings Work for Motorcycle and Action Footage?
The core Protune principles carry over: locked shutter, controlled ISO, and Flat color for grading flexibility. Motorcycle footage typically tolerates a lower-cost mount since vibration is lower frequency than helicopter rotor wash, but the 180-degree shutter rule and ND filter logic apply the same way in both settings.
How Do I Find a Helicopter Tour That Allows Camera Mounts?
Check operator policies before booking, since rules vary widely by company and aircraft type. Helicopterstour lists verified, FAA-certified operators and notes photography-friendly tours, which is a faster starting point than calling operators one by one to ask.
Recommended
- What to Wear on a Helicopter Tour: Clothing, Camera, Comfort Tips
- What to Expect on a Helicopter Tour: Before, During, and After
- Best Time of Day for a Helicopter Tour: Morning, Midday or Sunset
- Best Helicopter Tours for First-Time Flyers: What to Expect and How to Prepare